

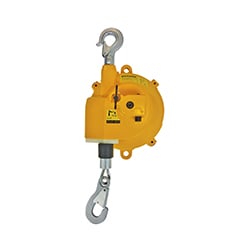


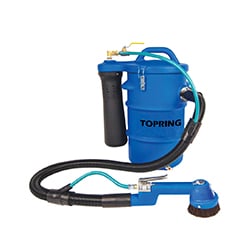

Plastic Tool Balancers
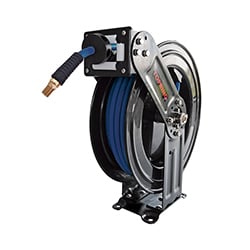
64.050 - With Hose
Installation
- Unpack and inspect the tool balancer to ensure there is no damage.
- Make sure that suspension hook is properly secured and swivels freely.
- Hang the tool balancer to a fixed support with sufficient capacity, considering the weight of the balancer and the tool.
- Ensure that pneumatic tools used with the balancer meet the minimum and maximum capacity (in kilograms).
- Adjust the tension according to the weight of the tool.
Operation
- To decrease the tension, press the latch while holding the adjustment wheel and turn it counterclockwise.
- Turn the adjusting knob clockwise to increase spring tension.
- Adjust the hose stopper so that the tool is at the desired height.
- Always retract the hose when attaching or detaching a tool to avoid uncontrolled retraction.
- During use, maintain a maximum angle of 20° from the vertical.
Maintenance
A regular inspection is required for safe operation:
- Verify the working conditions of all suspension components
- Make sure all suspension components are secured and tight
- Inspect hose and fittings for damages and leaks
Diagram and Dimensions

64.120-64.130 - With Cable
Installation and Maintenance


- Periodically inspect cable and hook for wear or looseness. Replace unit if required. Do not lubricate; balance reel is permanently lubricated.
Warning
- Do not attempt to remove spring from its canister. Damage or personal injury could result.
64.500 - With Cable
Installation
- Unpack and inspect the tool balancer to ensure there is no damage.
- Make sure that hanger and bottom hook are secured and swiveling properly.
- Attach the tool balancer to a fixed support with enough capacity to support tool balancer and tool weight.
- Attach a cable or chain to the secondary attachment point provided for added security.
- Leave some play in the secondary cable or chain to allow the tool balancer to rotate freely and stop within 10 cm of the work surface if falling.
- Make sure that tools used with the tool balancer respect minimum and maximum capacity (in kilograms).
- Adjust tension according to tool weight
Operation
- To decrease tension hold adjusting knob and release latch. Let knob turn clockwise slowly.
- Turn the knob counterclockwise to increase spring tension.
- Always bring hook to highest position to attach or detach from the balancer to avoid free winding of the cable.
- Keep the working angle of the cable below 20° from vertical.
Diagram and Dimensions

Steel Tool Balancers
64.200-64.250 - With Cable
Installation
- Unpack and inspect the tool balancer to ensure there is no damage.
- Make sure that hanger and bottom hook are steady and swiveling properly.
- Install the tool balancer on a steady and solid support.
- Always attach a secondary support cable or chain to the support hanger.
- Please make sure that the pneumatic tools used with tool balancer respect maximum capacity (in kg) of the bottom hook.
- Adjust the tension depending on maximum capacity.
Operation
- Before adjusting the tension, remove the load from the tool balancer.
- Use an Allen key to turn the adjustment nut clockwise on the back of the balancer to increase capacity.
- The "+" sign indicates the direction for increasing capacity.
- To decrease capacity, press the spring approximately 1-3 cm.
- To reset the load, move the spring in the direction indicated by the arrow.
- Loosen the screws, position the stop mechanism as needed, and then tighten the screws to secure it.
- Attach the tool using the closed hook, and check the load before replacing the tool.
- Remove pneumatic tools before detaching the hook to prevent accidental balancer drops.
- Maintain a maximum rope angle of 20°; exceeding this angle will reduce the cable’s lifespan.
Diagram and Dimensions

64.295-64.365 - With Constant Tension Cable or Ratchet
64.295-64.315 – Balancers (Constant Tension)
64.345-64.365 – Retractors (Ratchet/Self-Locking)
General Safety Rules
- Failure to follow proper usage and installation instructions may result in personal injury and/or property damage.
- Do not allow the spring to unwind uncontrollably, as this may cause damage or injury.
- To minimize cable and guide wear, install the balancer directly above the work area, preferably on a rail, ensuring the cable is pulled as straight as possible during use.
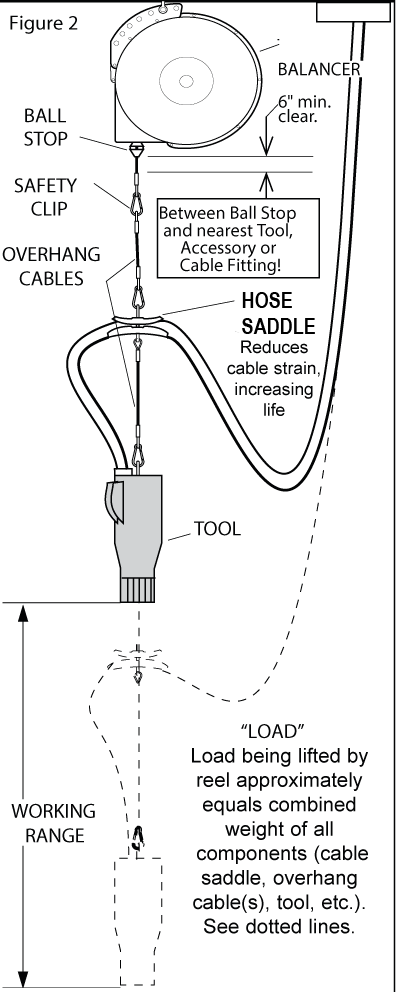
- All tools and electrical cables attached to the balancer cable MUST be at least 6 inches below the stopper.
Installation
- Use clevis to hang tool balancer in desired location. Be sure cotter pin is installed on clevis pin.
- Attach optional safety chain to secondary hanger bracket or other overhead support. Do not use the same attachment point as used for the clevis. See Figure 1.
Figure 1
Warning
- To prevent the balancer from falling, the shackle must be installed beforehand.
- It is recommended to use a safety chain and attach it to a secondary support.
- Failure to use the safety chain may result in injuries.
Attaching the Load
- For optimal use of the balancer, the tool (Figure 2) should be positioned at the top of the workspace without unwinding the balancer cable.
- Use a shorter cable to achieve the correct distance between the balancer and the tool.
- The balancer cable should only be used to move the tool within the workspace.
- To attach the load (all components connected to the balancer), lift the load first and then hook it onto the unrolled cable.
- DO NOT pull the cable first and then attach the tool.
Operation
Warning: Always lift the load onto the safety attachment on the balancer cable. DO NOT pull the balancer cable to load it, as this may damage the balancer or cause injury.
Installing the tool on the balancer
- Place a wrench on the flats of the shaft.
- Turn the shaft counterclockwise until the tool reaches the desired height.
Adjusting the tension
- Increase the tension if tool balancer will not completely rewind cable with load attached until cable stop reaches guide.
- Decrease the tension if lthe load cannot easily be pulled down to desired height.
- If tool balancer is so equipped, turn ratchet lock to “OFF” (knob is located on side of tool balancer).
- Place wrench on flats of shaft.
- Hold shaft firmly with wrench. Depress spring on opposite side of tool balancer.
- Allow shaft to turn SLOWLY in clockwise direction until desired tension is achieved. If shaft will not turn in clockwise direction UNASSISTED, tool balancer is at minimum tension and further tension reduction should not be attempted.
Warning: DO NOT allow the spring to unwind in an uncontrolled manner. Doing so can result in damage to tool balancer or personal injury.
Using the ratchet lock
- If tool balancer is equipped with ratchet lock, engage by pulling cable out to desired position and letting it retract SLOWLY until lock engages.
- To release lock, quickly pull cable out a short distance and allow it to begin to retract–it operates like a window shade. Ratchet lock may be disengaged by turning knob on side of tool balancer.
Maintenance
- Tool balancer is factory lubricated for life. No additional lubrication is required.
- Periodically check cable for wear. If wear is detected, cable should be replaced immediately.
Diagram and Dimensions

Aluminum Tool Balancers
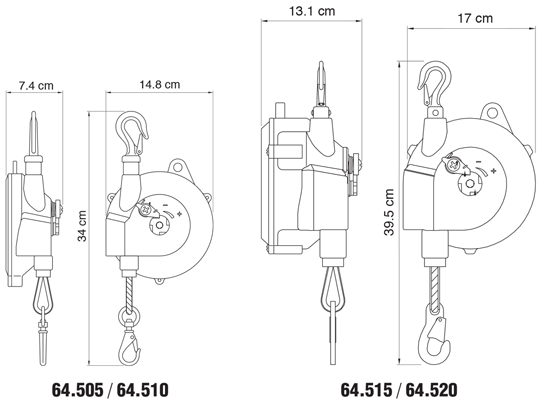
64.505-64.530 - With Cable
General Safety Rules
- Do not open the housing—uncontrolled spring unwinding may cause injuries.
Installation
- Unpack and inspect the tool balancer to ensure there is no damage.
- Make sure that hanger and bottom hook are secured and swiveling properly.
- Attach the tool balancer to a fixed support with enough capacity to support tool balancer and tool weight.
- Attach a cable or chain to the secondary attachment point provided for added security.
- Leave some play in the secondary cable or chain to allow the tool balancer to rotate freely and stop within 10 cm of the work surface if falling.
- Make sure that the pneumatic tools used with the tool balancer respect minimum and maximum capacity (in kilograms).
- Adjust tension according to tool weight.
Operation
64.505-64.510-64.515-64.520
- To increase tension turn Allen screw clockwise.
- To release tension hold spring tension with Allen screw and release latch, turn the screw anti clockwise.
64.525 – 64.530
- Use a flat wrench to turn the adjustment nut in the desired direction.
All models
- Always bring the tool to highest position to attach or detach from the balancer and to avoid free winding of the cable.
- Keep the working angle of the cable below 20° from vertical